OPC UA Client
Valid for
|
GridVis edition |
Software platform |
|
|
|

![]()
The function of the OPC UA Client in the GridVis Web is explained below.
The handling is analogous in the GridVis Desktop. There, you can open the OPC UA Client via the corresponding icon in the toolbar.
Creating a new connection
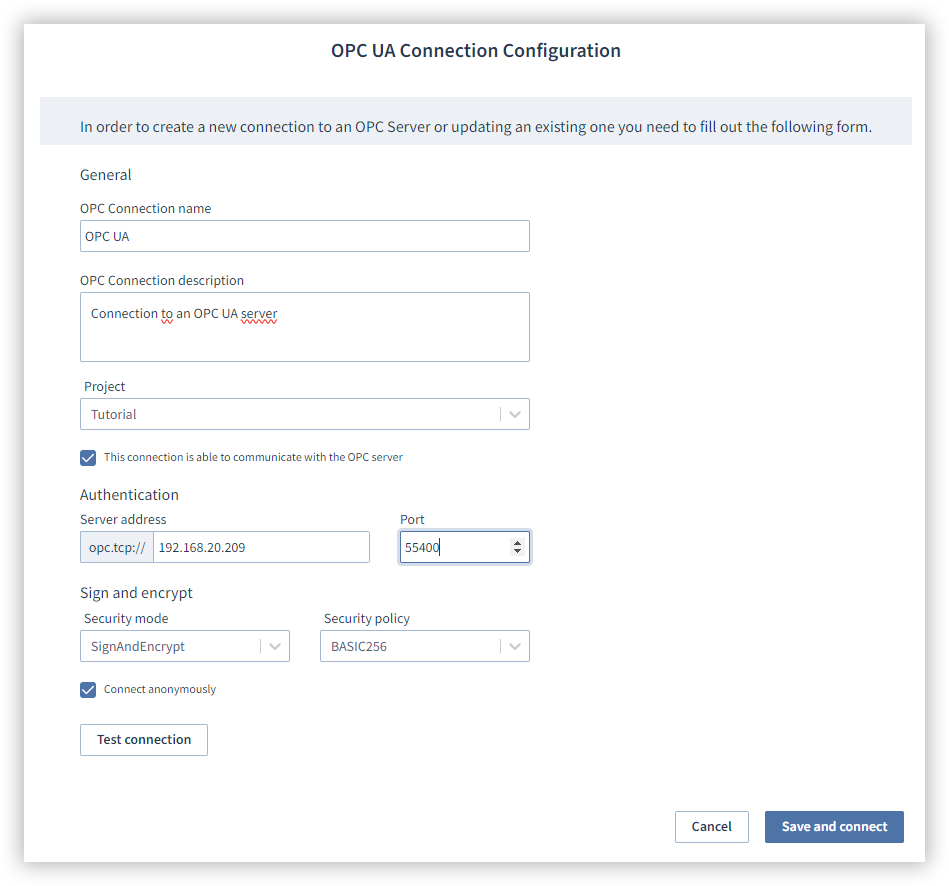
Open the OPC UA Client via the Administration menu item.
Click the Create new connection button.
Enter a name and description of the connection.
Assign the connection to a project if you have integrated several projects. Note that this assignment cannot be changed later.
Activate the checkbox to allow the connection to the OPC UA Server.
Enter the address and the port of the OPC UA Server.
Specify how you want to sign and encrypt your connection.
Enter your login data or activate the checkbox Connect anonymously. Note that not all servers support anonymous communication.
Check the connection to the server by clicking the button Test connection. If necessary, check the server address or your login data.
Click the button Save and connect to establish the connection to the OPC UA Server.
Working with tags
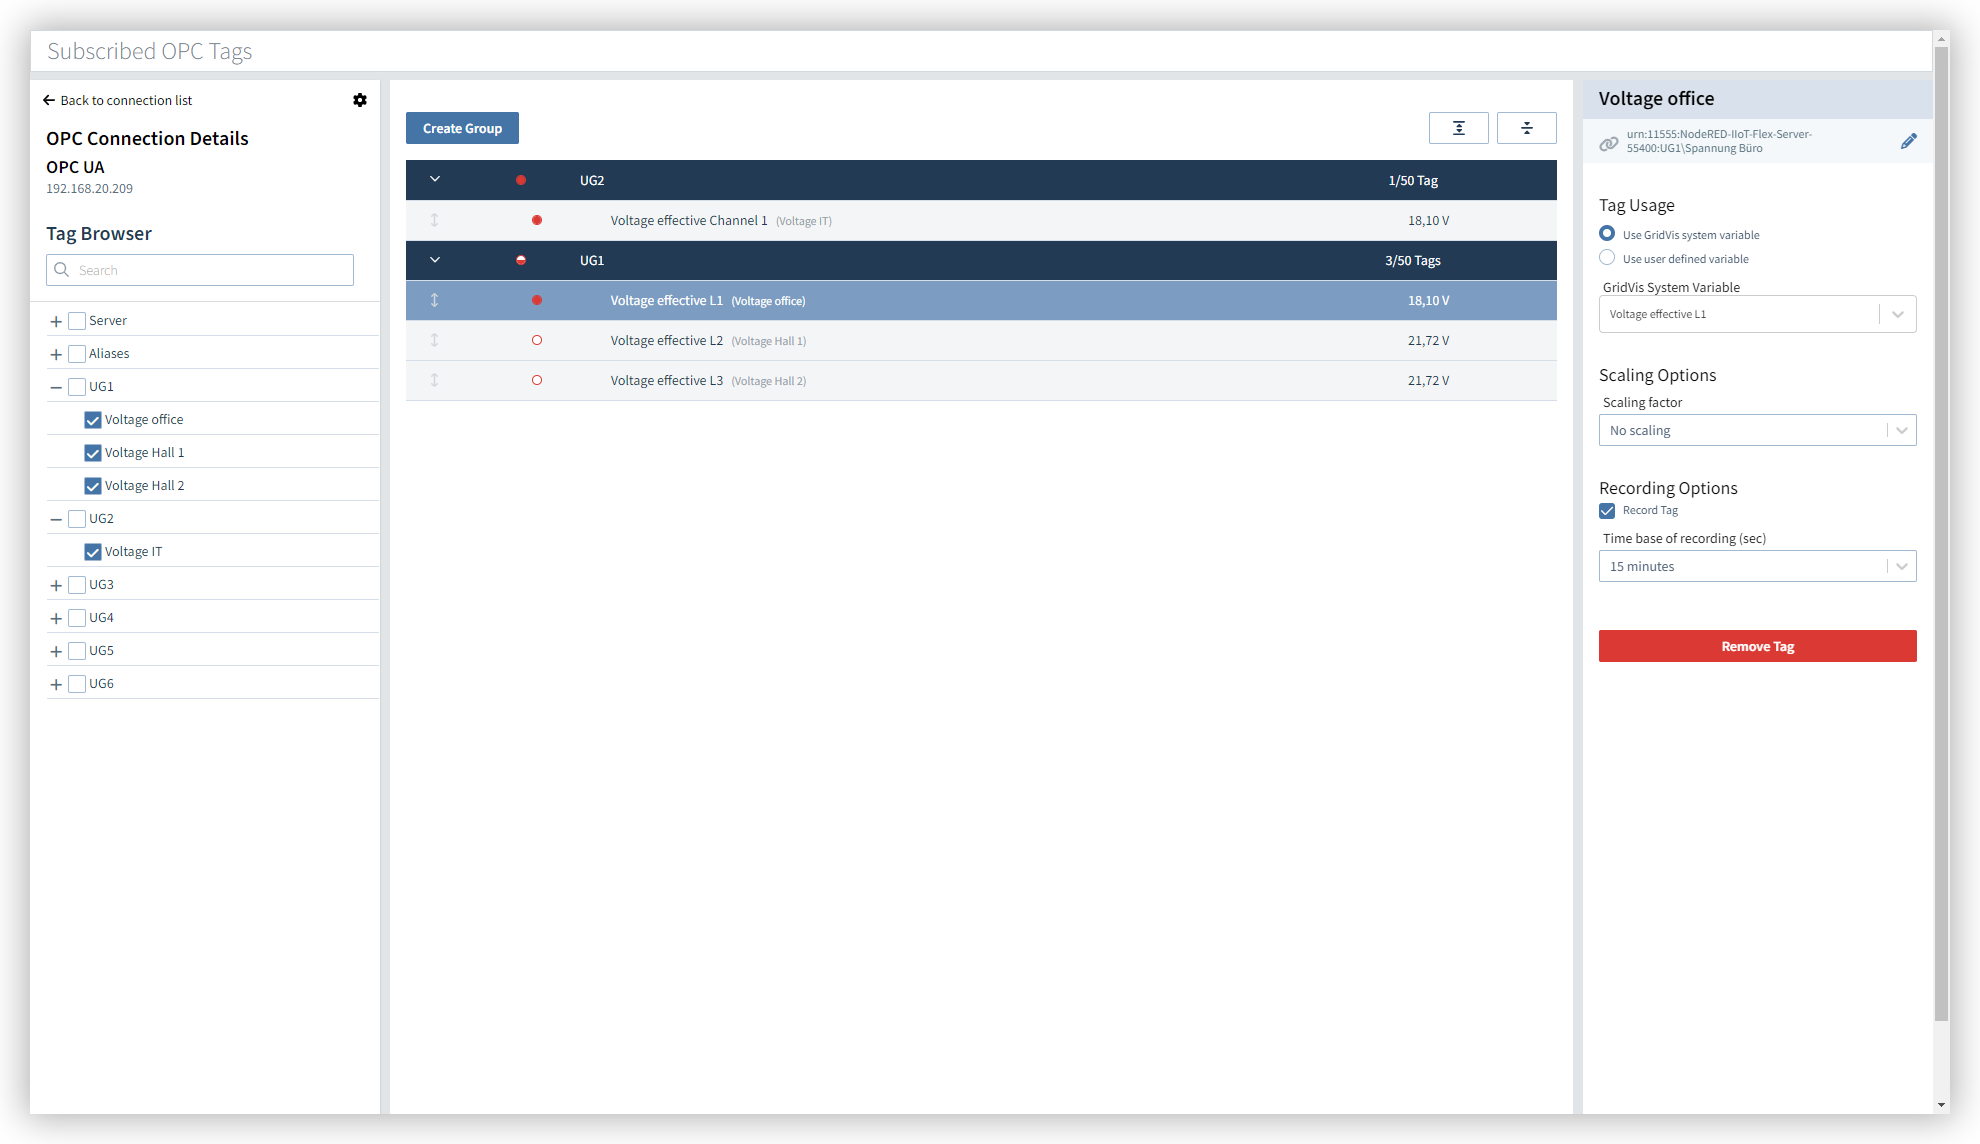
Subscribe to tags in a connection & define them
Click on a created connection.
Select the checkbox of a tag in the Tag Browser to subscribe to that tag. The tag is automatically assigned to the currently selected group. If no group exists yet, a new group will be created automatically.
Click on the subscribed tag and assign a variable to it. You have the option of using an existing GridVis system variable or creating a user-defined variable.
Proceed as follows to assign the tag a GridVis system variable:
Click on the radio button Use GridVis system variable.
Click on the drop-down area GridVis System Variable and enter the name of the measured value to obtain a list of possible system variables. Select the desired system variable.
Proceed as follows to assign the tag a user-defined system variable:
Click on the radio button Use user-defined system variable.
Enter a name for the variable in the Name input field. In the Unit input field, enter the unit for the variable and select a definition from the Definition drop-down list.
To obtain historical data, you must record the measured value. Activate the checkbox Record Tag and select the Time base for recording from the drop-down menu.
Create a new group
Click on the Create Group button.
Use the Name input field to edit the name of the group.
To obtain historical data, you must record the measured value. Activate the checkbox Record Group to record all measured values of the group. Use the Time base for recording drop-down menu to configure the recording of all measured values of the group.
Exporting and importing a connection
The OPC UA Client can be used to export and import an OPC UA connection as a CSV file. You can also compile this CSV file manually.
Note
Export an existing OPC UA connection and use this CSV file as a template.
Structure of the CSV file
The default separator is the comma. Other separators can be configured during export and import.
groupName
Name of a tag group.subGroupName [optional]
Name of a subgroup within a tag group. Subgroups cannot contain other subgroups.displayName
Display name of a data point on the OPC UA Server. The display name must be identical to the name of the data point used in the OPC UA Server.nodeId
Node ID of a data point on the OPC UA Server.browsePath
Browser path to a data point on the OPC UA Server.record
Flag to record a tag.
Possible values areTRUE
FALSE
scaleFactor
Scaling factor of a measured value.
Possible values areMICRO: Micro (µ)
MILLI: Milli (m)
NO: No scaling
KILO: Kilo (k)
MEGA: Mega (M)
GIGA: Giga (G)
TERA: Tera (T)
tagDefinition
Specifies whether GridVis treats the data point as a GridVis system variable or user-defined variable.
Possible values areSystemVariable
UserDefined
systemValue [optional]
Definition of the GridVis system variable. Must not contain a value if tagDefinition is set to UserDefined.Value example{"ns":"ValueWrap","obj":{"ns":"BasicValue","name":"U_Effective"},"tags":[{"ns":"TypeWrap","obj":{"ns":"BasicType","name":"L1"},"tags":[]}]}timebase
Time base of the recording in seconds. Must contain a value as a placeholder even if the tag is not recorded.
Possible values are60 (1 minute)
300 (5 minutes)
600 (10 minutes)
900 (15 minutes)
1800 (30 minutes)
3600 (1 hour)
userValueDefinition
Definition of the user-defined variable.
Possible values areConsumedEnergy: Consumption energy value
DeliveredEnergy: Feed-in energy value
ConsumedDeliveredEnergy: Energy value of consumption + feed-in
Interval: Energy value interval
Measurement: Measured value
SalesVolume: Sales
Items: Quantity
Square: Area
Employee: Employees
Maximum: Maximum
Average: AVG
Sum: Total
userValueName
Name of the user-defined variable.userValueUnit [optional]
Unit of the user-defined variable.
"groupName","subGroupName","displayName","nodeId","browsePath","record","scaleFactor","tagDefinition","systemValue","timebase","userValueDefinition","userValueName","userValueUnit""New Group 1","New Sub-Group 1","ULNRms","ns=2;i=55707","https://opc.janitza.de/umg801/public:Device\Measurements\UG\U2\ULNRms","TRUE","MEGA","UserDefined","","300","Measurement","Spannung","V""New Group 1","","ULNRms","ns=2;i=55806","https://opc.janitza.de/umg801/public:Device\Measurements\UG\U1\ULNRms","FALSE","NO","SystemVariable","{""ns"":""ValueWrap"",""obj"":{""ns"":""BasicValue"",""name"":""U_Effective""},""tags"":[{""ns"":""TypeWrap"",""obj"":{""ns"":""BasicType"",""name"":""L1""},""tags"":[]}]}","900","ConsumedEnergy","","""New Group 2","New Sub-Group 2","ULNRms","ns=2;i=55896","https://opc.janitza.de/umg801/public:Device\Measurements\UG\U3\ULNRms","FALSE","MILLI","UserDefined","","900","ConsumedEnergy","Spannung2","V"Signing and encrypting
The use of signed and encrypted connections in the OPC UA protocol offers you advantages for the protection of sensitive information and secure communication. Signatures ensure the authenticity and integrity of the data. Encryption ensures confidentiality and only grants access to authorized parties. You can find out how to create the encryption during the configuration of the OPC UA Server in the section Creating a new connection .
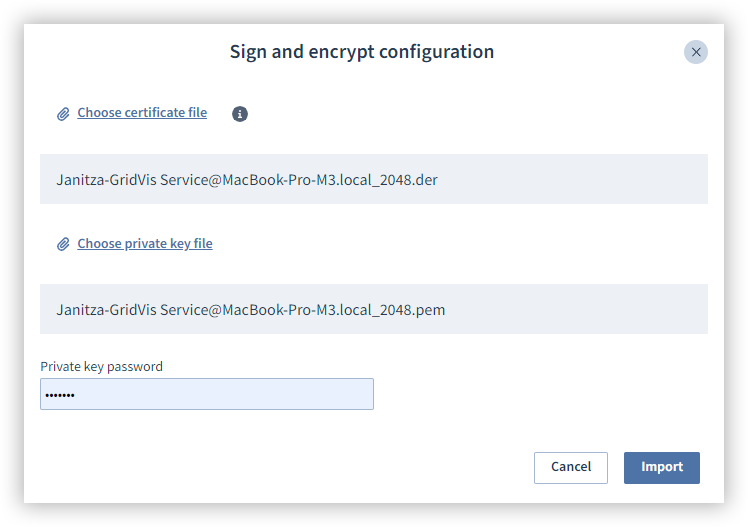
Click on the button Signing and Encrypting.
Click on the link Select Certificate File and upload the X.509 certificate.
Click on the link Select Private Key File and upload the key file.
Enter the password for the private key.
Finally, click the Import button.
Note
The data is encrypted with the help of a public key/certificate so that secure transmission of your data is guaranteed. The recipient's private key is required for decryption. This procedure ensures that only the owner of the private key can read the encrypted message, even if the public key is generally accessible.
The following files are supported for certificates:
.der
The following files are supported for keys:
.pem
.pfx
.key