Function Templates (Template Editor)


General Description

Templates are for the reuse of saved dashboards. In addition to the individual creation of a template, the GridVis software features over 10 templates (in German and English) that the user can adapt to fit his own requirements as needed. The function Templates shortens the configuration time for energy and measurement data visualizations. The configuration of the dashboards for multiple measuring devices is made more efficient through the use of templates and the web visualizations appear to be "of one piece" (the same layouts).

Note

  • If one and the same layout should be reused to visualize different measuring devices (and measurement values), use the function Templates.

  • Because templates are dashboards saved for reuse, proceed in the creation of your template, as described in Function Dashboards .

  • Previously created dashboards can not be saved as a template! Before starting to create a dashboard or template, consider its use!


How do I open the function Templates in the GridVis Web?

  • In the menu bar, click on the button Dashboards.

  • In the menu bar, click on the button Navigation and in the drop-down menu, click on the menu entry Dashboards.

The Dashboard Manger opens.

  • Click on the View menu.

  • Click on the Go to prior graphical user interface button.

  • To get to the template overview, click on the button Templates in the subnavigation.


Overview Window of the Function Templates

images/download/attachments/251037707/Temp_uebersicht_01_EN-version-1-modificationdate-1521111865000-api-v2.png

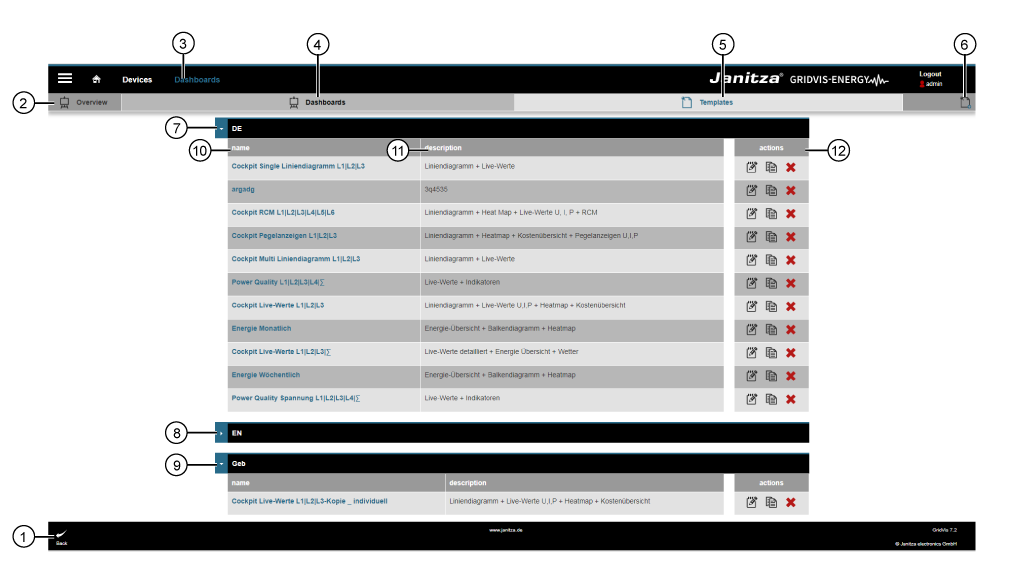
Menu Navigation -> Dashboards > Templates button in the subnavigation

Position

Description

1

  • Leads to the previous window.

2

  • You are in the Templates window.

3

  • Fast selection menu Dashboards.

  • Opens the window Overview with the registers Dashboards and Templates.

4

5

  • Opens the overview Templates.

6

  • Opens the assistant Edit Template to create a new template.

7

  • 10 available German-language templates.

Note

To edit available templates,

  • first click on the button Copy in the Actions area (cf. Pos. 12),

  • save your template and

  • then edit your template using the button Edit.

8

  • 10 available English-language templates.

9

  • Individually created templates.

  • To adapt the templates provided by the system to suit your requirements, first copy and save the provided template (cf. Notification Pos. 7).

10

  • Name of the template.

  • Configuration of the name is done in the assistant Edit Template .

  • For provided templates, configure the name first, after you have copied the template.

11

  • Configuration of the description is done in the assistant Edit Template .

  • For the provided templates, configure the description first, after you have copied the template.

12

  • images/download/thumbnails/251037707/edit_sw-version-1-modificationdate-1517404598000-api-v2.png Opens the assistant Edit Template.

  • To edit all of the entries made by the assistant to a provided template, first copy and save the provided template again.

  • images/download/thumbnails/251037707/copy_sw-version-1-modificationdate-1517404598000-api-v2.png Opens a copy of the marked template in the assistant Edit Template .

  • images/download/thumbnails/251037707/cancel_delete-version-1-modificationdate-1517404598000-api-v2.png Deletes the marked Template with a yes/no query.


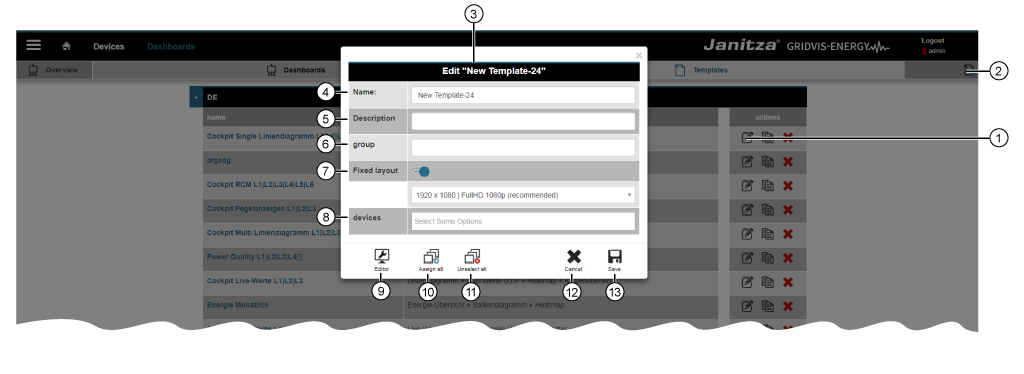
Assistant Edit Template

  • Click on the button Edit (in the column Actions of the overview window) or the button Add Template for an assistant to appear to configure the template.

  • You can create your individual template (saved dashboard for reuse) via the button Editor (Pos. 9). To adapt the templates provided by the system to suit your requirements, first copy and save the provided template.


images/download/attachments/251037707/Template_Assistent_02_EN-version-1-modificationdate-1521111892000-api-v2.png

Position

Description

1

  • Opens the assistant Edit (New) Template.

Note

To edit available templates,

  • first click on the button Copy in the Actions,

  • save your template and

  • then edit your template using the button Edit.

2

  • Opens the assistant Edit (New) Template.

3

  • The assistants for Edit (New) Template and Edit Template are uniformly configured.

4

  • The entry appears in the overview window Templates in the group column Name.

5

  • The entry appears in the overview window Templates in the group column Description.

6

  • The entry appears in the overview window Templates as a grouping row.

7

Slider off:

  • The system uses a standard monitor format to display the template.

Slider on: Select the monitor format for the following media:

  • 720 x 576 | DVB PAL, DVD-Video PAL

  • 1280 x720 | HDTV 720p

  • 1900 x 800 | UHXGA, Chrome user-defined (recommended)

  • 1900 x 920 | Full HD, Chrome user-defined (recommended)

  • 1900 x 930 | UHXGA, Full screen optimized (F11) (recommended)

  • 1900 x 1050 | Full HD, Full screen optimized (F11) (recommended)

  • 1920 x 1080 | Full HD 1080p (recommended)

  • 1920 x 1200 | UHXGA (recommended)

  • 2048 x 1152 | HD-MAC / QWXGA

  • 2048 x 1536 | 2K

  • 3840 x 2160 | UHDV-1

  • 4096 x 3072 | 4K

  • 7680 x 4320 | UHDV-2

  • 7680 x 4800 | UHXGA

8

  • Click in the option field to show all of the devices integrated in the GridVis project.

  • It is possible to select more than one at a time.

  • The template is available to the selected devices for web visualization.
    You can find information for visualization under

9

  • Only available for new (Button Add Template - Pos. 2) and previously saved templates !
    To adapt the templates provided by the system to suit your requirements, first copy and save the provided template. the provided template (cf. Notification Pos. 1).

  • Opens the editor to design your template (for the reuse of the saved dashboard). Edit your template, as described in Function Dashboards .

10

  • Assigns all devices in your GridVis project to the template.

11

  • Removes all devices in your GridVis project from the template.

12

  • Closes the assistant Edit Template.

  • Any entries will be lost.

13

  • Saves your entries.