Data Import (DI) Edit
First Example of CSV Import (Number of items)
Second Example of "CSV Import" (Energy Data)
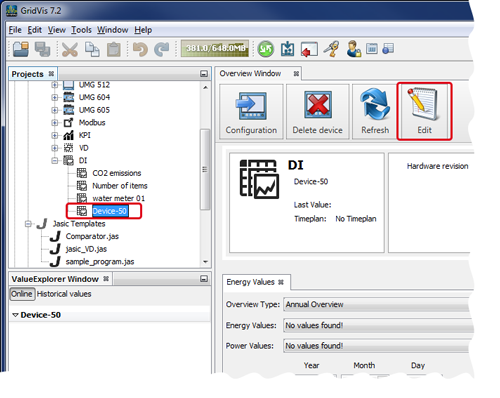
With the function Data Import - Edit you can integrate power values, performance or values form other media manually or with a CSV import file with an individually configured CSV structure into your GridVis software.
After the DI device has been configured ( Data Import - Configuration ), open the Overview Window (click on the DI device).
Click on the button Edit.
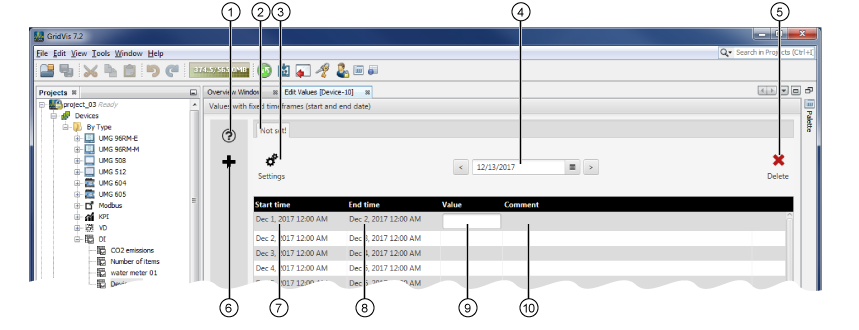
The window Edit Values will open.
|
Pos. |
Description |
|
1 |
Opens the Direct Help Guide. |
|
2 |
The Name of Variable configured in Settings (Pos. 3) determines the name of value list (of the register). |
|
3 |
Opens the window Select or define a measurement value. In the window Select or define a measurement value you can configure the entry or import settings for your measurement values (see below for a more detailed description). |
|
4 |
Entry field and buttons for selecting the date. |
|
5 |
Deletes the list Tab of your measurement values. |
|
6 |
Creates a new Value List (N/A). |
|
7 |
Starting Time of the time period for which the measurement value is valid. |
|
8 |
Stopping Time of the time period for which it is valid. |
|
9 |
Entry field Valuen formanual entry. The editing of your entered values can be defined in the window
Select or Design a Measurement Value
fenstereinstellungenDI(see below for a more detailed description). Press the return key to confirm the values you enter! |
|
10 |
Entry field for Comments Press the return key to confirm what you enter! |
Note
The other screen grabs show examples of data imports. The screen grabs may vary depending on the value type.
The window Select or define a measurement value
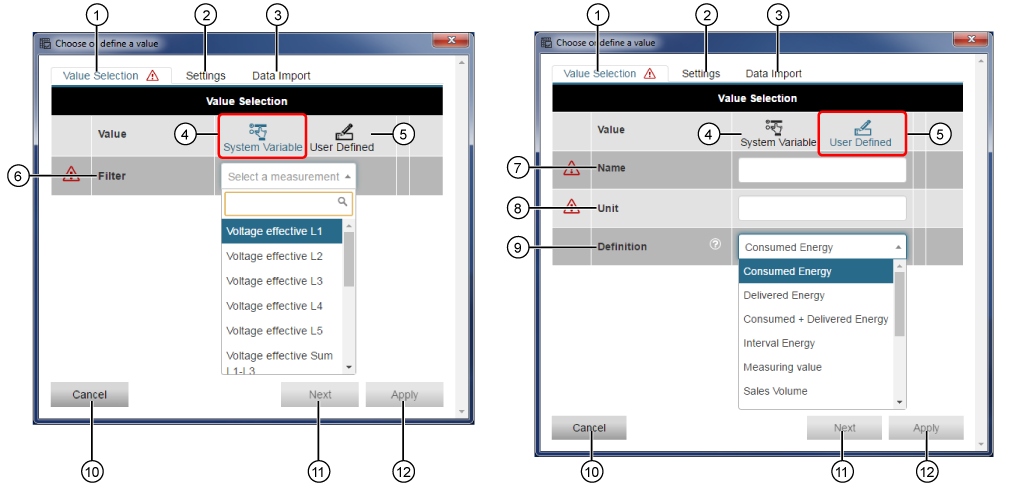
In the window Select or define a measurement value, you can configure the processing of the values you have entered manually or via a CSV file .
In the Value List in the window Edit Values, click on the button Settings (
 ).
).In the window Select or Define a Measurement Value, the first register Value Selection will appear.
|
Pos. |
Description |
|
1 |
Click on the register to activate it. The symbol |
|
2 |
Click on the register to activate it. |
|
3 |
Click on the register to activate it. The symbol |
|
4 |
Variables supplied by the system (measurement values). If the button is activated (blue), entry parameters will appear for defining the measurement values / measurements for the system variables. |
|
5 |
User-defined variable. If the button is activated (blue), entry parameters will appear for defining user-defined measurement values / measurements variables. |
|
6 |
Search and sort filter for the system variables (measurement values / measurements).
|
|
7 |
Name of your measurement value / your measurement.
|
|
8 |
Unit of your measurement value / your measurement.
|
|
9 |
In the option list Definition, select the calculation mode for your measurement value / how GridVis processes the measurement value. The selection has an effect on the calculation, recording and graphical representation of the measurement value. |
|
10 |
Single-clicking will take you back to the values list in the Edit Values window. Deletes entries already made in the Select or Define a Measurement Value window. |
|
11 |
Single-clicking takes you to the next register. |
|
12 |
Single-clicking on the active button saves your entries. |
 in the register fades out if the data entry is valid.
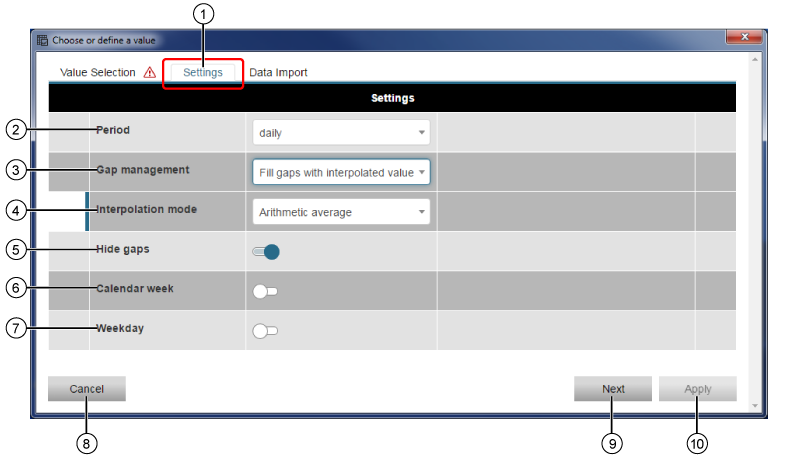
|
Pos. |
Description |
|
1 |
Click on the register to activate it. |
|
2 |
Cycle in which the measurement values are saved (e.g. Daily ... The system saves one value every day). Settings:
Note
|
|
3 |
How the system handles measurement value gaps (missing data). Settings:
Note
Interpolation > See glossary below. |
|
4 |
The option list Interpolation Mode appears when in Gap Management the item Fill Gaps with Interpolated Values has been selected. Settings:
|
|
5 |
An active slider hidesmissing measurement values (gaps) in the Value List . |
|
6 |
If the slider is active, the calendar weeks appear in the Value List. |
|
7 |
If the slider is active, the days of the week appear in the Value List. |
|
8 |
Single-clicking will take you back to the values list in the Edit Values. Deletes entries already made in the Select or Define a Measurement Value. |
|
9 |
Single-clicking takes you to the next register. |
|
10 |
Single-clicking on the active button saves your entries. |
|
Pos. |
Description |
|
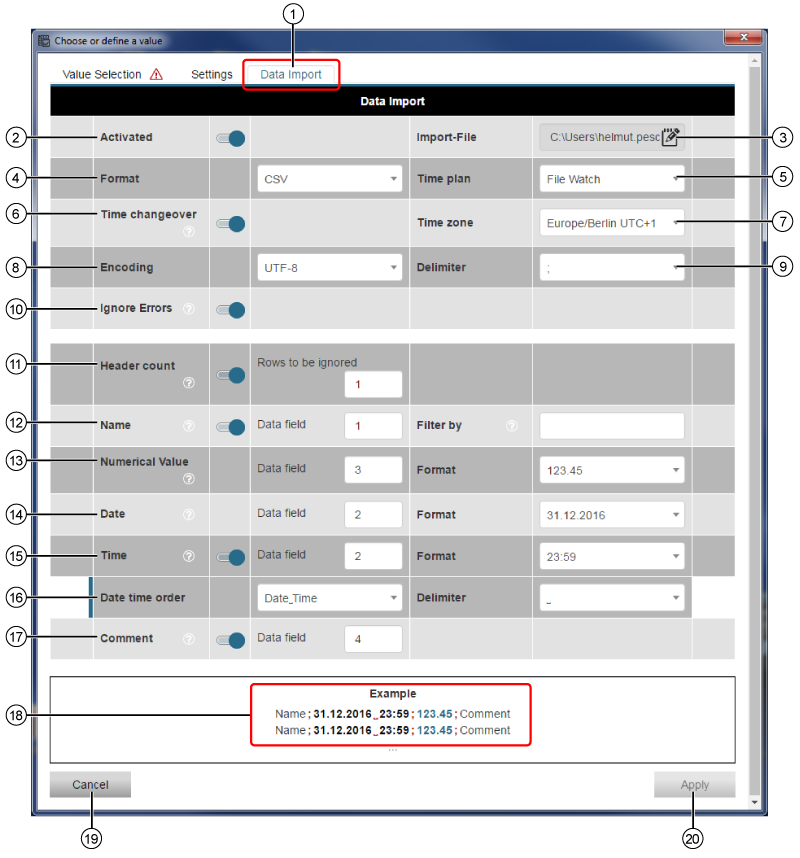
1 |
Click on the register to activate it. The attention symbol " |
|
2 |
the slider activates the function Data Import (Standard setting = off), and with it all of the parameters in the register. Available in the GridVis Standard edition and higher. The attention symbol " Deleted Data Imports remain in the database until they have been permanently deleted (see Data Import - Delete Device ). |
|
3 |
Click on the button In the dialog box Open edit and select the name and path of the Import File (CSV file). The last loaded Import File appears in the selection field. In the register Data Import, the attention symbol Values in the Import File overwrite the values in your Value List if they are in the same time pattern! Confirm with the buttons Transfer or Transfer to in the configuration window of the device (see Data Import - Configuration ) to have the system transfer the new data to the GridVis database. Note Ensure that the GridVis software can access the import file (CSV file)! Assign the user of the service the respective rights! The attention symbol appears if the file formats are defective or have a different structure, and if there are invalid value formats in the Import File. |
|
4 |
In the option list Format you can configure your file format. Supported file format: CSV (with freely configured CSV structure). The File Import conforms to CSV RFC-4180 . The File Import supports CLRF, CL and RF line breaks. If the import format is valid, the attention symbol |
|
5 |
In the option list Schedule, assign the File Import a schedule. Supported schedules:
Timepoints
|
|
6 |
Summer/Winter time change for the time values of the Import File. |
|
7 |
Time Zone. (Standard setting:Europe/Berlin UTC+1 for Germany). |
|
8 |
Select the character coding for your Import File. Supported character codings:
Note Malfunction will result from incorrect character coding!
Depending on the character coding, umlauts (ä, ü, ö) in your import file may lead to the malfunction of your data import. Do not use any umlauts (ä, ü, ö) in your import file! Pay attention to the correct character coding! |
|
9 |
Selection of delimiters for the entered values in the Import File Supported delimiters:
|
|
10 |
If the slider is activated, the system will ignore entries with errors in your import file. |
|
11 |
The slider activates the Header Entry (if applicable) in your import file. Enter the number of lines to by ignored into the entry field of the Import File. Standard setting = 0. |
|
12 |
The slider activates the column entry Designation (name of the measurement value, if applicable) of your Import File (Standard setting inactive). Enter into the data field the column number that corresponds to the column Designation (name of the measurement value) of your import file. By using entries in the entry field Filter the system sorts/filters according to Designations (names)of measurement values (useful, e.g. for import files with multiple measurement values). Supports the Wildcard Function (Entry of placeholders for other characters , e.g. *). Supports the entry of multiple names separated by the ; character. |
|
13 |
Enter into the data field the column number that corresponds to the column Measurement Value (numerical value) of your import file (standard setting = 2). Selection Format - Options: 123.45, 123,456.78, 123.45, 123,456.78. |
|
14 |
Enter into the data field the column number that corresponds to the column Date of your import file. Selection Format - Options: 31.12.16, 31.12.2016, 31/12/16, 31/12/2016, 12/31/16, 12/31/2016. |
|
15 |
The slider activates the column entry Time (if applicable) of your Import File (Standard setting inactive). A row marked with Enter into the data field the column number that corresponds to the column Time of your import file. Selection Format - Options: 23:59, 23:59:59, 11:59 PM. Note If in your import file Date and Time are in the same column, assign the same column numbers! |
|
16 |
If the same column number was assigned for Date and Time, then the entry Order will appear. In the options field, select the entry order (Date_Time or Time_Date). Selection Delimiters between Date and Time,- Options: Space," ";,""|," ",." |
|
17 |
The slider activates the column entry Comment (if applicable) in your import file (standard setting inactive). Enter into the data field the column number that corresponds to the column Comment of your import file. |
|
18 |
The display field Example shows you the previously selected format settings in real time. |
|
19 |
Single-clicking will take you back to the values list in the Edit Values. Deletes entries already made in the Select or Define a Measurement Value. |
|
20 |
Single-clicking on the active button saves your entries. |
To complete the configuration, click on the button Apply.
The GridVis software value list takes your data from the CSV file after a Closing and Opening of the register Edit Values.
Please note: the time required to transfer the data may last up to 1 minute.