New Alarm Source
Description
The creation of an alarm plan is a precondition for configuring the alarm sources (measuring devices)! After you have set up your alarm plan and added it to your alarm management, you can create the alarm source(s).
Alarm sources are always assigned to an alarm plan (cf.
New Alarm Plan
and
Alarm Plans
)!
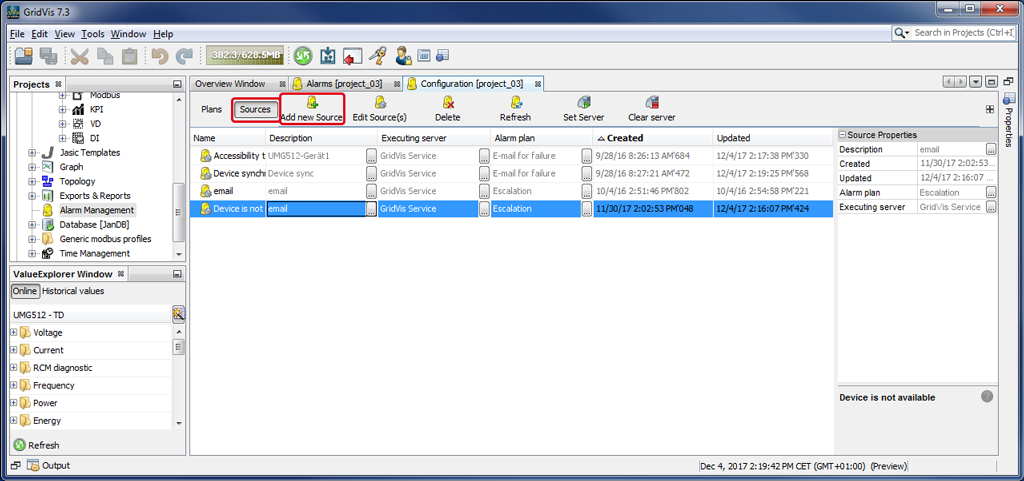
After you have opened the widow (Alarm) Configuration (cf. Window (Alarm-) Configuration ), click on the button Alarm Sources to activate the buttons for editing and managing the alarm sources.
Click on the button New Alarm Source.
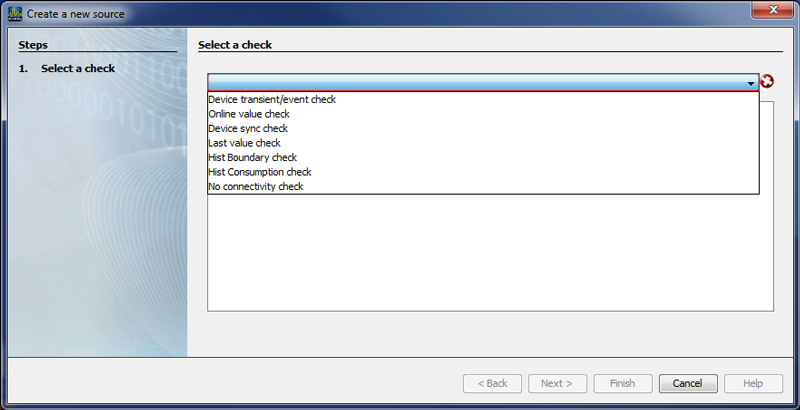
The dialog box Create New Alarm Source will open.
In the window Create New Alarm Source, select your check.
Depending on the check you select, an assistant will start the configuration of a new alarm source. The assistant will guide you through the respective entry steps of the checks.
The following list shows the checks and their entry steps:
To switch to the next step, activate the button Continue, and after the last step has been completed, click on the button Done.
|
|
Steps |
Description |
|
1 |
Select Alarm Source |
Checks the alarm source (measuring devices) for transients and events. |
|
2 |
Select Checks |
Select your check as Event and/or Transient. |
|
3 |
Query Interval |
|
|
4 |
Threshold for Transients |
Select the duration (threshold) and the tolerated number of transients within it in which the alarm will not be activated. If the threshold is exceeded, the alarm will be activated. |
|
5 |
Threshold for Events |
Select the duration (threshold) and the tolerated number of events within it in which the alarm will not be activated. If the threshold is exceeded, the alarm will be activated. |
|
6 |
Select Alarm Plan |
Assign the configured alarm source to a previously created alarm plan. |
|
7 |
Title and Description |
Configure the title and description of the alarm source. |
|
8 |
Select a GridVis |
Select the service (cf. Function Set Server ) of your GridVis edition on the GridVis server that executes this alarm source. |
|
9 |
Choose Time period |
Select a Time Period from the Time Management of your GridVis. The alarm source will only be checked within the time period defined here. |
The alarm source with the executing GridVis server appears in the list of Alarm Sources in the window (Alarm) Configuration and can be edited, deleted, managed and set as desired.
To switch to the next step, activate the button Continue, and after the last step has been completed, click on the button Done.
|
|
Steps |
Description |
|
1 |
Select Alarm Source |
Checks an online value for a set threshold violation. |
|
2 |
Select Devices |
Mark your measuring device(s) by activating the respective checkbox(es). |
|
3 |
Select Value Types and Thresholds |
Configure a selection of online value types and thresholds. Marl the desired online value(s) in the depicted value tree. Configure the lower thresholds, upper thresholds and hysteresis for the online values (in the respective column and in the right half of the window Properties) by clicking on the buttons "..." If the threshold is violated, the alarm will be activated. If hysteresis is defined, the triggering and resetting of the alarm are shifted by half the hysteresis to the threshold limit. |
|
4 |
Select Alarm Plan |
Assign the configured alarm source to a previously created alarm plan. |
|
5 |
Title and Description |
Configure the title and description of the alarm source. |
|
6 |
Select a GridVis |
Select the service (cf. Function Set Server ) of your GridVis edition on the GridVis server that executes this alarm source. |
|
7 |
Choose Time period |
Select a Time Period from the Time Management of your GridVis. The alarm source will only be checked within the time period defined here. |
The alarm source with the executing GridVis server appears in the list of Alarm Sources in the window (Alarm) Configuration and can be edited, deleted, managed and set as desired.
To switch to the next step, activate the button Continue, and after the last step has been completed, click on the button "Done."
|
|
Steps |
Description |
|
1 |
Select Alarm Source |
Checks the last state of the device synchronization. An alarm is activated if there is an error in the device synchronization. |
|
2 |
Select Devices |
Mark your measuring device(s) by activating the respective checkbox(es). |
|
3 |
Time Frame |
To avoid false alarms, configure a time frame in which errors are tolerated. Please note: The time frame must be larger than the highest synchronization time interval of the selected measuring devices. |
|
4 |
Interval |
Configure the time interval for the automatic checks. |
|
5 |
Select Alarm Plan |
Assign the configured alarm source to a previously created alarm plan. |
|
6 |
Title and Description |
Configure the title and description of the alarm source. |
|
7 |
Select a GridVis |
Select the service (cf. Function Set Server ) of your GridVis edition on the GridVis server that executes this alarm source. |
|
8 |
Choose Time period |
Select a Time Period from the Time Management of your GridVis. The alarm source will only be checked within the time period defined here. |
The alarm source with the executing GridVis server appears in the list of Alarm Sources in the window (Alarm) Configuration and can be edited, deleted, managed and set as desired.
To switch to the next step, activate the button Continue, and after the last step has been completed, click on the button "Done."
|
|
Steps |
Description |
|
1 |
Select Alarm Source |
Checks the last value saved to the database. If there are errors in the values, an alarm will be activated. |
|
2 |
Select Devices |
Mark your measuring device(s) by activating the respective checkbox(es). |
|
3 |
Select Values with the same Time Basis |
Mark the values to be checked (precondition: device recordings in the database, selection of values with the same time basis). |
|
4 |
Time Frame |
To avoid false alarms, configure a time frame in which errors are tolerated.
|
|
5 |
Interval |
Configure the time interval for the automatic checks. |
|
6 |
Select Alarm Plan |
Assign the configured alarm source to a previously created alarm plan. |
|
7 |
Title and Description |
Configure the title and description of the alarm source. |
|
8 |
Select a GridVis |
Select the service (cf. Function Set Server ) of your GridVis edition on the GridVis server that executes this alarm source. |
|
9 |
Choose Time period |
Select a Time Period from the Time Management of your GridVis. The alarm source will only be checked within the time period defined here. |
The alarm source with the executing GridVis server appears in the list of Alarm Sources in the window (Alarm) Configuration and can be edited, deleted, managed and set as desired.
To switch to the next step, activate the button Continue, and after the last step has been completed, click on the button Done.
|
|
Steps |
Description |
|
1 |
Select Alarm Source |
Checks the database values for violations of the set thresholds. |
|
2 |
Select Devices |
Mark your measuring device(s) by activating the respective checkbox(es). |
|
3 |
Select Values and Thresholds |
Mark a selection of historical value types and thresholds in the value tree. Configure the lower and/or upper thresholds in the right half of the window. An alarm will be activated if there are threhold violations for the values in the database. If hysteresis is defined, the triggering and resetting of the alarm are shifted by half the hysteresis to the threshold limit. |
|
4 |
Time Frame |
Configure the time limit for the database region to be checked. The region to be checked is between the set time limit and the current timepoint. |
|
5 |
Select Alarm Plan |
Assign the configured alarm source to a previously created alarm plan. |
|
6 |
Title and Description |
Configure the title and description of the alarm source. |
|
7 |
Select a GridVis |
Select the service (cf. Function Set Server ) of your GridVis edition on the GridVis server that executes this alarm source. |
|
8 |
Choose Time period |
Select a Time Period from the Time Management of your GridVis. The alarm source will only be checked within the time period defined here. |
The alarm source with the executing GridVis server appears in the list of Alarm Sources in the window (Alarm) Configuration and can be edited, deleted, managed and set as desired.
To switch to the next step, activate the button Continue, and after the last step has been completed, click on the button Done.
|
|
Steps |
Description |
|
1 |
Select Alarm Source |
Checks the consumption values in the database against their limits |
|
2 |
Select Devices |
|
|
3 |
Select Value Types and Thresholds |
|
|
4 |
Time Frame |
|
|
5 |
Select Alarm Plan |
|
|
6 |
Title and Description |
|
|
7 |
Select a GridVis |
|
|
8 |
Choose Time period |
|
The alarm source with the executing GridVis server appears in the list of Alarm Sources in the window (Alarm) Configuration and can be edited, deleted, managed and set as desired.
To switch to the next step, activate the button Continue, and after the last step has been completed, click on the button Done.
|
|
Steps |
Description |
|
1 |
Select Alarm Source |
Checks the availability of the measuring devices. If there are connection problems, an alarm is activated. |
|
2 |
Select Devices |
Mark your measuring device(s) by activating the respective checkbox(es). |
|
3 |
Interval |
Configure the time interval for the automatic checks. |
|
4 |
Select Alarm Plan |
Assign the configured alarm source to a previously created alarm plan. |
|
5 |
Title and Description |
Configure the title and description of the alarm source. |
|
6 |
Select a GridVis |
Select the service (cf. Function Set Server ) of your GridVis edition on the GridVis server that executes this alarm source. |
|
7 |
Choose Time period |
Select a Time Period from the Time Management of your GridVis. The alarm source will only be checked within the time period defined here. |
The alarm source with the executing GridVis server appears in the list of Alarm Sources in the window (Alarm) Configuration and can be edited, deleted, managed and set as desired.